Study Confirmation System
Depending on how OnePacs has been configured for your facility, it may be necessary for studies transmitted to OnePacs to be “confirmed” before they are ready to be interpreted for reporting. “Confirmation” of studies serves all the usual purposes of paper study requisitions - they confirm that interpretation has been requested for an examination, provide basic information regarding the patient and the requesting physician, describe where the report should be sent, and provide study history.
Confirmation consists of the following steps:
- Confirmation of the need for the study to be interpreted or reinterpreted.
- Entry of relevant clinical history
- Entry of a referring clinician's name and phone number for telephoned results reporting, if needed
- Depending on the configuration of your facility other items like study types, subgroups, and information about prior exams may be required.
- Studies can also be confirmed via an HL7 order
If OnePacs has been configured to require study confirmation, new studies will appear on the worklist with an “unconfirmed” icon, that is, a blank report paper with a question mark:
If your OnePacs account allows you to confirm studies, you can bring up the study confirmation window either by right-clicking on the study and selecting “Confirm study status” from the pop-up menu, or by double-clicking on the study.
The study confirmation window appears as follows:
Note the following elements of the study confirmation window:
• The bar at the top is pre-populated with information about the study which was transmitted automatically to OnePacs along with the study. This includes patient name, medical record number, study description, image count, and other data.
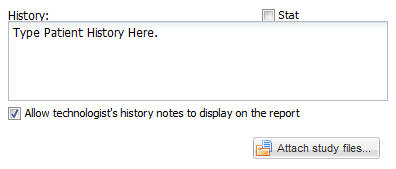
• Below this bar, in the upper left hand corner, there is a text edit field for entering clinical history, or any other information which will be needed for study interpretation; for example, one may include instructions to telephone the results to a particular destination, or to compare the study with a prior examination.
• There is also a checkbox which may be used to indicate that an examination is “STAT”.
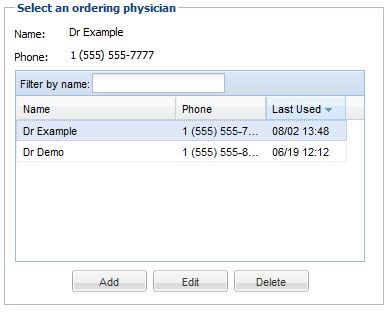
• In the lower left, there is a field used for indicating the ordering physician, and a contact number at which the ordering physician may be contacted. You may click on a name in the list to indicate that the physician in question ordered the study. You may also add new names to the list, delete names from the list, or edit existing list entries. You may also manage ordering physicians by using the ordering physician Admin → Ordering Physician menu if you have the ability to manage user accounts. This will allow the deletion of multiple ordering physicians at once. You may setup a fax number if you have faxing ability or an email address for an ordering physician. If using the email address the ordering physician should also have a OnePacs user account to view the report from the sent link. These are special report destinations that will appear when the ordering physician is selected.
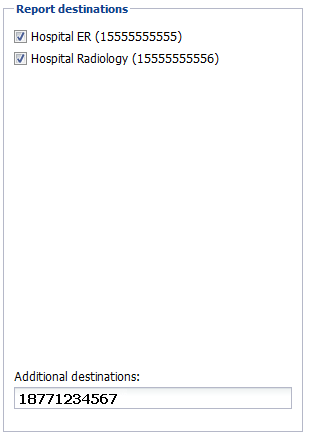
• On the right, there is a list of destinations to which the report will be transmitted. These may be fax numbers (if fax transmission has been enabled for your facility in OnePacs), HL7 interface names, or email addresses to which HIPAA-compliant report notifications would be sent. In this case, we see two destinations available: Hospital ER and Hospital Radiology. The checkboxes are both indicating that the report will be sent to both destinations when it is completed. If it is desired that the report be not be sent to a particular destination simply uncheck the checkboxes adjacent to the destination in this window will cause the report to not be sent to that particular destination.
• On the lower right, there is a text entry field into which additional destinations may be entered. If you wish to transmit the report to a destination which was not listed in the Report destinations list, you may type an additional destination into this window. If a 10-digit phone number is entered (1 plus area code and phone number, in a continuous string of characters), the report will be faxed to that phone number (assuming fax transmissions are enabled for your facility in OnePacs.) If an email address is entered, a HIPAA-compliant link will be emailed to the email address, informing the recipient that a report is available for review on OnePacs, and providing them with the report if they click on the link and enter their username and password.
Optional confirmation fields
Comparison Studies
There may be a section for the technologist to give information about priors above the report destinations. The technologist should select the proper prior selection and provide additional information if needed.
IV Contrast
There may be an IV contrast section that is either optional or mandatory when confirming an MR or CT study, requiring the technician to select if contrast was used, and if applicable the type of contrast and dosage.
Other Study Information
There may be other data either optionally or mandatory when confirming certain types of studies.
Read Type: If the imaging facility may require either a final or preliminary report, the technician may request a certain type of read be performed.
Laterality: The technician be either optionally or be required to enter laterality.
Reformations: A list of reformations may be either optional or required for MR, CT, or NM cases
Subgroup: The subgroup for the study may need to be entered.
Study Types
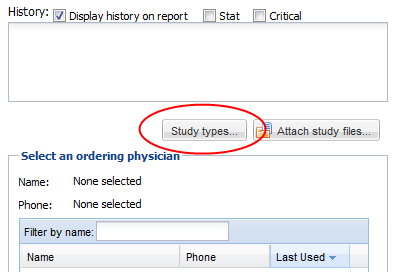
Users may also have the ability to set study types from the confirmation screen if the “Confirmation Study Type” setting is set to optional or mandatory under the facility settings. Click on the “Study types” button and select study types for the study. Click done to return to the confirmation screen.
Completing the confirmation
• At the very bottom of the study confirmation window, there are four buttons used to indicate the final confirmation status:
-To confirm the study and set the study state to “Ready to read”, click the “Confirm study” button.
-If the study should appear on the worklist but is available only for comparison purposes (and does not need a report), click the “Study is for comparison” button.
-If the study does not need to be interpreted, click the “Disregard study” button. This may be useful if the study was sent only for archiving purposes, for example.
-To cancel study confirmation, click the cancel button.
- A user may also revert a read case back to a status of ready to read by requesting a reinterpretation of a study via the confirmation screen. If a study has already been read the confirmation screen will have an option for “confirm for re-interpretation” that will mark the study as ready to read. You may also click the “Save changes” button to save the information but not request re-interpretation.
The technologist will be prompted to provide a reason for the re-interpretation request. This information will be entered a note on the study.


