OnePacs Diagnostic Workstation
Certifications and Registrations
US FDA: According to US Food and Drug Administration classification rules, the OnePacs system is a 'Medical Image Communication Device', or a class I medical device. OnePacs satisfies the requirements of the FDA for manufacturers of Class I devices, including Establishment Registration, Device Listing, U.S. Agent and Quality Systems (QS) regulation (21 CFR Part 820).
 According to the guidelines stated in Directive 93/42/EEC of the European Community, the OnePacs system is a Class I Medical Device. OnePacs satisfies the requirements for bearing the CE mark on its labeling.
...
Windows
- Operating system: The preferred operating system is Windows 8.1 64-bit. The 64-bit versions of Windows 7 and 8 are also supported.
Note Windows Vista and 32-bit variants of Windows 7 - 8.1 are supported but not recommended.
- Additional software requirements: .NET 4.5 or later, Visual C++ 2010 runtime, Microsoft SQL server compact edition (installed automatically if needed).
- Memory: At least 4 GB RAM. 8 GB or more is recommended.
Info 16GB of RAM or more is recommended if rendering large image sets and/or using third party applications like voice recognition software.
- Hard drive space: 50 GB or more free space is recommended. Performance is best with a solid state hard drive (SSD).
- Processor: An Intel i3, i5 or i7 processor (or similarly performing AMD processor) is recommended. Older dual core processors such as the Intel Core 2 Duo series will also work, though performance may be decreased. As the OnePacs Workstation and Study Retriever software packages are heavily multi-threaded, at least four processor cores are recommended, and hyperthreading is useful.
- Anti-Virus: OnePacs recommends excluding the C:\onepacs directory from your anti-virus scans.
- NOTE: Virtualized environments (such as VMware Fusion or Parallels on OS X) are not recommended or supported configurations for OnePacs Workstation. Per user feedback, OnePacs Workstation appears to work well in VMware Fusion version 7, while issues have been reported with Parallels. Thus, if users wish to attempt to run OnePacs Workstation in virtualization on OS X, VMware version 5 would likely be the preferred environment. However, OnePacs does not officially support or recommend virtualized environments, and would not be able to offer technical support specific to technical issues that occur with running OnePacs Workstation in virtualization.
Mac OS X
- The OnePacs Study Retriever is available for MacOS X 10.7+. The OnePacs Workstation software is a Windows-only solution; we recommend use of OsiriX for users who wish to view studies on a Mac OS X system.
All platforms
- For diagnostic image viewing, appropriate diagnostic-quality and regulation-compliant monitors should be used.
- For worklist viewing and report editing, video resolution of at least 1024 x 800 is recommended.
- The OnePacs license agreement requires physical access restrictions limiting physical access to the workstation to authorized personnel with a legitimate need to access the equipment and/or the use of whole hard disk encryption (e.g. BitLocker on Windows or FileVault on OSX).
Installation
A single executable installer file is provided. Users with access privileges allowing use of the Diagnostic Workstation and Study Retriever software will be offered the opportunity to download an installer for the software on login to OnePacs. The installer may also be downloaded on demand from the Options → Downloads menu item.
Study Retriever
The Study Retriever is a software package that interacts with the OnePacs servers over the internet to determine what studies need to be downloaded to a local workstation, to download such studies, and to store such studies to the user's preferred DICOM viewing software package. More details on this package are provided here.
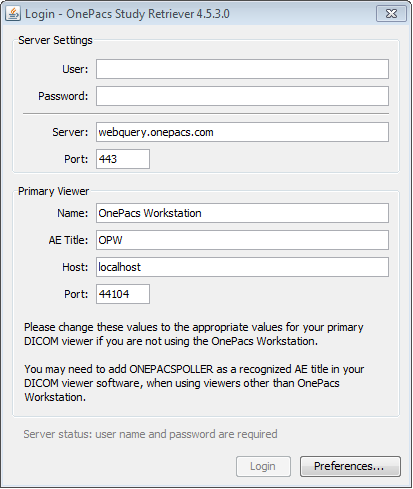
After rebooting the system after installing the OnePacs Workstation, the login screen for the OnePacs Study Retriever will display, as follows:
On Microsoft Windows systems, there may be a prompt from the Windows firewall regarding whether to allow the Study Retriever access to the internet. This will appear as follows:
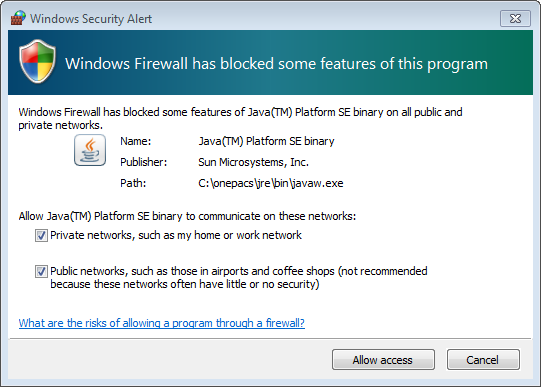
Please allow access on all networks (public and private) to ensure smooth functioning. (The windows warning regarding communications on public networks being insecure does not apply to the OnePacs system, as OnePacs uses only secure encrypted communication channels on all networks.)
OnePacs Diagnostic Workstation
The OnePacs Diagnostic Workstation (OPW) is a full featured DICOM study viewer that comes packaged free with the OnePacs system.
Accessing studies
Studies may be accessed and viewed in OPW in a variety of ways.
OnePacs Study Retriever
The OnePacs Study Retriever, described above, is the usual means of viewing studies from the OnePacs Web Server worklist on the OPW.
DICOM Query and Retrieve
OPW is capable of querying DICOM archives and retrieving studies for local viewing. Such DICOM archives may be other DICOM viewing software installed on your local Workstation, imaging modalities such as CT scanners or ultrasound machines, or the Gateway PC used to transmit studies to the OnePacs Web Servers.
The Gateway and your Workstation must be configured by your local administrator to allow your Workstation to query and retrieve studies from the Gateway. If such configuration has been performed, the following steps may be used to query the Gateway and retrieve studies from it.
First, select the Gateway as your chosen DICOM study source in the Explorer window. To do this, first click on the “Explorer” tab, which is the leftmost tab immediately below the application menus at the top of the main OPW window. Next, make sure that the “DICOM” tab, beneath the Explorer tab, is selected, rather than the “Local files” tab. When the “DICOM” tab is selected in the Explorer view, you will find a folder labeled “Servers”, which has a pre-configured entry called “OnePacs Gateway”.
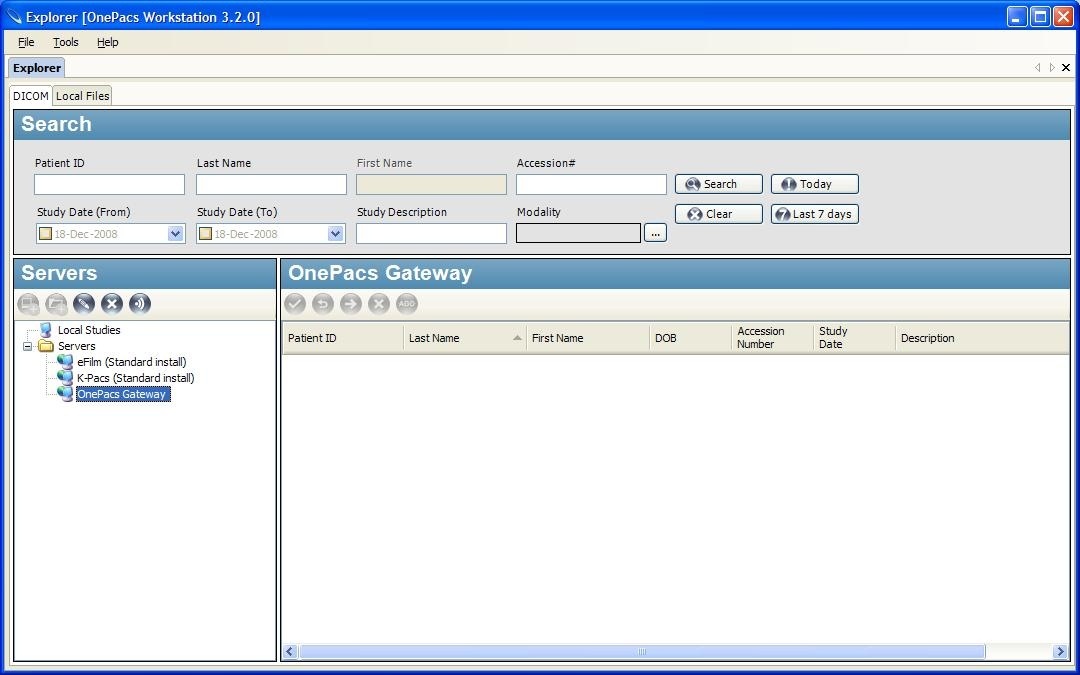
When the Gateway server entry is selected as the study source in the Explorer view, the search tools at the top of the explorer screen may be used to query the Gateway PC and display a list of DICOM studies available for viewing. By double-clicking on the study you wish to view, or by selecting one or more studies and clicking on the “retrieve” icon, the studies will be retrieved from the Gateway and stored locally in OPW so they may be viewed.
To view the study after it has been retrieved, select “Local studies” as the source for studies to be viewed, then double-click the study entry in the results panel in the lower right hand corner of the Explorer screen.
File system import
It is also possible to import studies from the filesystem for viewing in OnePacs, or for transmission to the OnePacs Web Servers. In the Explorer tab, click on the “Local Filesystem”
DICOM Send
It is also possible to send studies from OnePacs Workstation to another DICOM destination, such as an alternative viewer, the OnePacs Gateway (for transmission to the OnePacs Web Server), another user's OnePacs Workstation, or other DICOM devices such as MR or CT scanners.
To do so, first add the DICOM destination as a server in the server list. In the Explorer window, right-click on the “Servers” folder and select “Add server”. In the “Server Name” field, enter the name by which you would like the destination to be listed in the server list. This name is for convenience and is not part of the actual communication protocol. In the “Host” field, enter the IP address or host name of the destination. The field “Location” is for labelling convenience and is also not used in actual communications.
In the DICOM section, enter the AE title and port of the DICOM destination.
The Image Streaming section of the “Add New Server” will provide support for image streaming when used with future updates of the OnePacs Web Servers.
When the above values are entered, you may use the echo  icon to verify connection to the DICOM device. Some DICOM devices may require that the AE title of the Workstation (by default, OPW) be added to the device's list of approved AE titles before they will respond to the verification echo.
To send studies to the destination, once added, select “Local studies” as the study source in the Explorer window, find and select the study in the search results window, then use the send  button to transmit the study or studies to the chosen destination.
If studies are sent to the OnePacs Gateway destination, they will be automatically added to your OnePacs database of studies and will be available in the OnePacs worklist.
OnePacs Workstation Tools
Study viewing and manipulation tools
OnePacs Diagnostic Workstation offers a full set of the tools commonly used in viewing and manipulating DICOM images.
Tools available for use include:
Image manipulation
 The pan tool, for adjusting the display position of the current image set on the screen
 The zoom tool, for adjusting the level of magnification
 The window and level adjustment tool
 The stack tool, for scrolling through the current series
 The spine labeling tool, for labeling vertebral bodies on sagittal and coronal images
 The MPR tool can be used to perform multiplanar reformats (NOTE: This feature has not been certified for clinical use)
Image measurements
 ROI tools, for elliptical and rectangular ROIs. (The Elliptical icon is shown)
 The ruler, for spatial measurements
Multiple series coordination
 The link tool, to scroll related series simultaneously
 The unlink too, to break a previously established link
 The spatial locator tool, to display the location of a point in space, selected on one series, on other simultaneously displayed series
Worklist Integration Tools
The OnePacs Diagnostic Workstation offers the following tools to integrate your work within the Workstation with the OnePacs worklist.
 The view report tool is used to display the diagnostic report, if available, for the currently open study.
 The write report tool is used to open the reporting window for the currently open study.
 The clipboard is used to select a series of images or multiframe images for export as JPEG or AVI, or for designation as key images. To view the clipboard contents, use the clipboard tool.
 To add images to the clipboard, right-click on the image you wish to add and select “Copy image to clipboard”, or use the copy to clipboard tool.
 To create key images allowing them to be made available within the report as designated in the facility Report Template configuration. Once created, use the save key images icon.
 The save all contents of the clipboard as key images (key objects) for the studies from which the images derive, use the save key image tool.
Key images can be viewed in reports for which key object placeholders have been inserted into the report template, or they can be viewed in the study preview feature on the worklist.
Multiple monitor support
It is possible to distribute imaging series across multiple monitors with OnePacs workstation. To do this, use the “grow box” control in the lower right corner of the viewing window to expand the size of the window, extending the window from the original monitor onto an additional monitor. The window can be made to fill two or more monitors completely. When this is done, the viewing regions of the window will be divided across the monitors. For example, if a 4 x 2 viewing layout is selected in the layout manager for a window which spans two monitors, each monitor will utilize a 2 x 2 viewing area.
It is also possible to distribute multiple studies across multiple monitors with the OnePacs workstation. For example, one may want to put a prior study on a right monitor and the current study on the left monitor. To do this, select the study tab of one of the studies and begin to drag it. Arrows will appear on the window. Drag the tab to the arrow position where you would like the study and release study in the arrow. This will create a divider for the two studies. Next, use the “grow box” control in the lower right corner of the viewing window to expand the size of the window and position the studies in two different windows.
It will usually be desirable to view the imaging studies in a separate window from the Explorer when using multiple monitors, such that the case list in the Explorer window is not split across more than one window. To do this, select the Options… item from the Tools menu, then select “Window configuration”. Select the “Always open images in a separate window” option.
Using Key Images
When reviewing studies on OnePacs Workstation, it is possible to designate certain images as Key Images, and to display such Key Images within diagnostic imaging reports.
To select key images, first add the images you wish to select as Key to the clipboard. The clipboard is a tool for selecting sets of images to act on later, such as by saving them to disk in JPEG or AVI format, or for designating such images as Key Images on the OnePacs system.
To add images to the clipboard, first navigate to the image which you wish to designate as key, then right-click on the image and select “Add to clipboard” or More Tools> Clipboard> "Copy Image to Clipboard". After selecting a set of images, you may click on the Clipboard tool to review the designated Key Images. Images may be deleted at this point if you no longer wish to include them in the final Key Image set.
After the Clipboard holds a satisfactory set of Key Images, use the Create Key Images tool , then use the Save Key Images tool to designate the contents of the Clipboard as key images for the study in question. The user will receive a prompt that the Key Images have been successfully saved.
Once images have been designated as Key Images, they will be visible as a distinct series in the preview section of the OnePacs Worklist, and they can be included in diagnostic imaging reports if the reports use a Template which includes Key Image tokens. When reporting a study which contains Key Images, be sure to select a Template for the study in question that is designed to display key images.
Hanging Protocols
...
| Include Page | ||||
|---|---|---|---|---|
|